一劳永逸解决你的https证书问题
一劳永逸解决你的https证书问题
引言
HTTPS证书是网站安全的重要保障,但对于运维人员来说,频繁的证书更新无疑是一项繁琐的工作。免费的证书通常只有30天有效期,需要不断关注并手动续期,这不仅耗时,还可能因疏忽导致证书过期,影响网站正常运行。本文将介绍一种一劳永逸的解决方案,通过自动化工具和流程,彻底解决HTTPS证书的续期问题。
原理
自动化HTTPS证书续期的核心原理是基于ACME协议。ACME协议由Let’s Encrypt项目提出,旨在简化证书的申请、部署和续期过程。
-
ACME协议:
ACME协议定义了一套标准化的流程,允许客户端(如Certbot)与证书颁发机构(如Let’s Encrypt)进行通信,自动化完成证书的申请和续期。
-
Let’s Encrypt:
Let’s Encrypt是一个免费、自动化、开放的证书颁发机构,提供90天有效期的SSL/TLS证书。
部署步骤
创建GitHub仓库
- 下载代码:从项目下载压缩包代码。
- 新建仓库:在GitHub上创建一个新的仓库,用于存放自动化脚本和配置文件。
-
git到本地:将新建的仓库克隆到本地环境。
1
git clone https://github.com/yourusername/your-repo.git
-
推送到远端:把压缩包的文件丢进去,然后将本地修改后的代码推送到GitHub仓库。
1
2
3
git add .
git commit -m "Initial commit"
git push origin main
- 启动workflow:在GitHub仓库中配置并启动自动化工作流。
新建workflow
-
新建workflow文件:在仓库的
.github/workflows目录下创建一个新的YAML文件,例如auto-renew-aliyun.yml。 -
编写workflow脚本:
1
2
3
4
5
6
7
8
9
10
11
12
13
14
15
16
17
18
19
20
21
22
23
24
25
26
27
28
29
30
31
32
33
34
35
36
37
38
39
40
41
42
43
44
45
46
47
48
49
50
51
52
53
54
55
56
57
58
59
60
61
62
63
64
65
66
67
68
69
70
71
72
73
74
75
76
77
78
79
80
81
82
83
84
85
86
87
88
89
90
91
92
93
94
95
96
97
98
99
100
101
name: Aliyun SSL Certificates

on:
  schedule: # execute every 24 hours
    - cron: "40 6 * * *"
  workflow_dispatch:

env:
    ACME: /home/runner/.acme.sh/acme.sh
    Ali_Key: $
    Ali_Secret: $
    EMAIL: $

jobs:
  build:
    runs-on: ubuntu-latest
    if: github.event_name == 'schedule' || github.event.repository.owner.id == github.event.sender.id # 除了定时和repo owner手动触发的事件外, 其他不执行
    steps:
    - name: Checkout
      uses: actions/checkout@v4
    - name: Install & Configure acme.sh
      run: |
        curl  https://get.acme.sh | sh -s email=$EMAIL
    - name: Issue & Deploy Certificates
      run: |
        export ALI_KEY=$ALI_KEY
        export ALI_SECRET=$ALI_SECRET

        git config --global user.email $EMAIL
        git config --global user.name acme

        # 如果想要其他证书发行机构,可以把 acme.sh 的ca目录拷贝到 repo 的 ca目录
        # mkdir -p /home/runner/.acme.sh/ca/
        # cp -r ca/* /home/runner/.acme.sh/ca/

        check_certificate_validity() {
          cert_path=$1
          if [ -f "$cert_path" ]; then
            if openssl x509 -checkend $(( 30 * 86400 )) -noout -in "$cert_path"; then
              echo "Certificate at $cert_path is valid for more than 30 days, skipping..."
              return 0
            else
              return 1
            fi
          else
            return 1
          fi
        }

        issue_and_install_certificate() {
          domain=$1
          cert_type=$2 # "EC" or "RSA"
          acme_server=$3 # default choose "letsencrypt" 其他 CA 请参考 https://github.com/acmesh-official/acme.sh/wiki/CA
          keylength=$4 # empty for EC, "3072" for RSA

          cert_path="./ssl/$domain"
          [ "$cert_type" = "RSA" ] && cert_path="$cert_path/rsa"
          cert_file="$cert_path/$domain.cer"
          key_file="$cert_path/$domain.key"

          # Issue certificate
          issue_status=0
          $ACME --issue --server $acme_server --debug --dns dns_ali -d "$domain" -d "*.$domain" ${keylength:+--keylength $keylength}|| issue_status=$?
          if [ $issue_status -ne 0 ]; then
            echo "Failed to issue $cert_type certificate for $domain, skipping..."
            return
          fi

          # Install certificate
          install_status=0
          $ACME --installcert -d "$domain" --key-file "$key_file" --fullchain-file "$cert_file" || install_status=$?
          if [ $install_status -ne 0 ]; then
            echo "Failed to install $cert_type certificate for $domain, skipping..."
            return
          fi

          TIMESTAMP=$(date +"%Y-%m-%d %H:%M:%S")
          git add $cert_path/
          git commit -m "Update $cert_type certificate files for $domain at $TIMESTAMP"
        }

        while IFS= read -r domain || [ -n "$domain" ]; do
          mkdir -p "./ssl/$domain/rsa"

          # Check and issue/install EC certificate
          if ! check_certificate_validity "./ssl/$domain/$domain.cer"; then
            issue_and_install_certificate "$domain" "EC" "letsencrypt" ""
          fi

          # Check and issue/install RSA certificate
          if ! check_certificate_validity "./ssl/$domain/rsa/$domain.cer"; then
            issue_and_install_certificate "$domain" "RSA" "letsencrypt" "3072"
          fi

        done < ali_domains_list.txt
    - name: Pull latest changes
      run: git pull origin main
    - name: Push changes
      uses: ad-m/github-push-action@master
      with:
        github_token: $
设置 GitHub Actions 权限
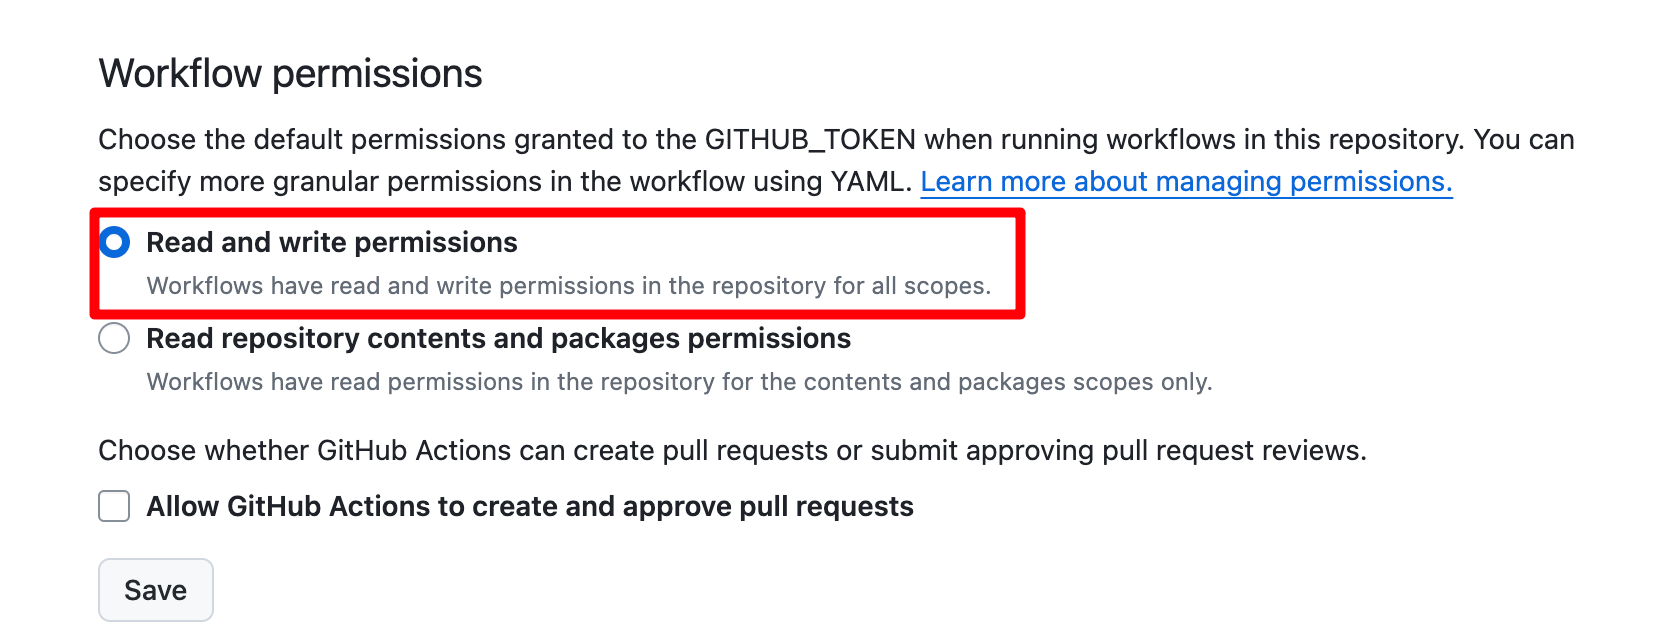
在 GitHub 仓库中,依次访问 Settings -> Code and automation -> Actions -> General -> Workflow permissions,勾选 Read and write permissions 权限。
环境变量设置
阿里云配置
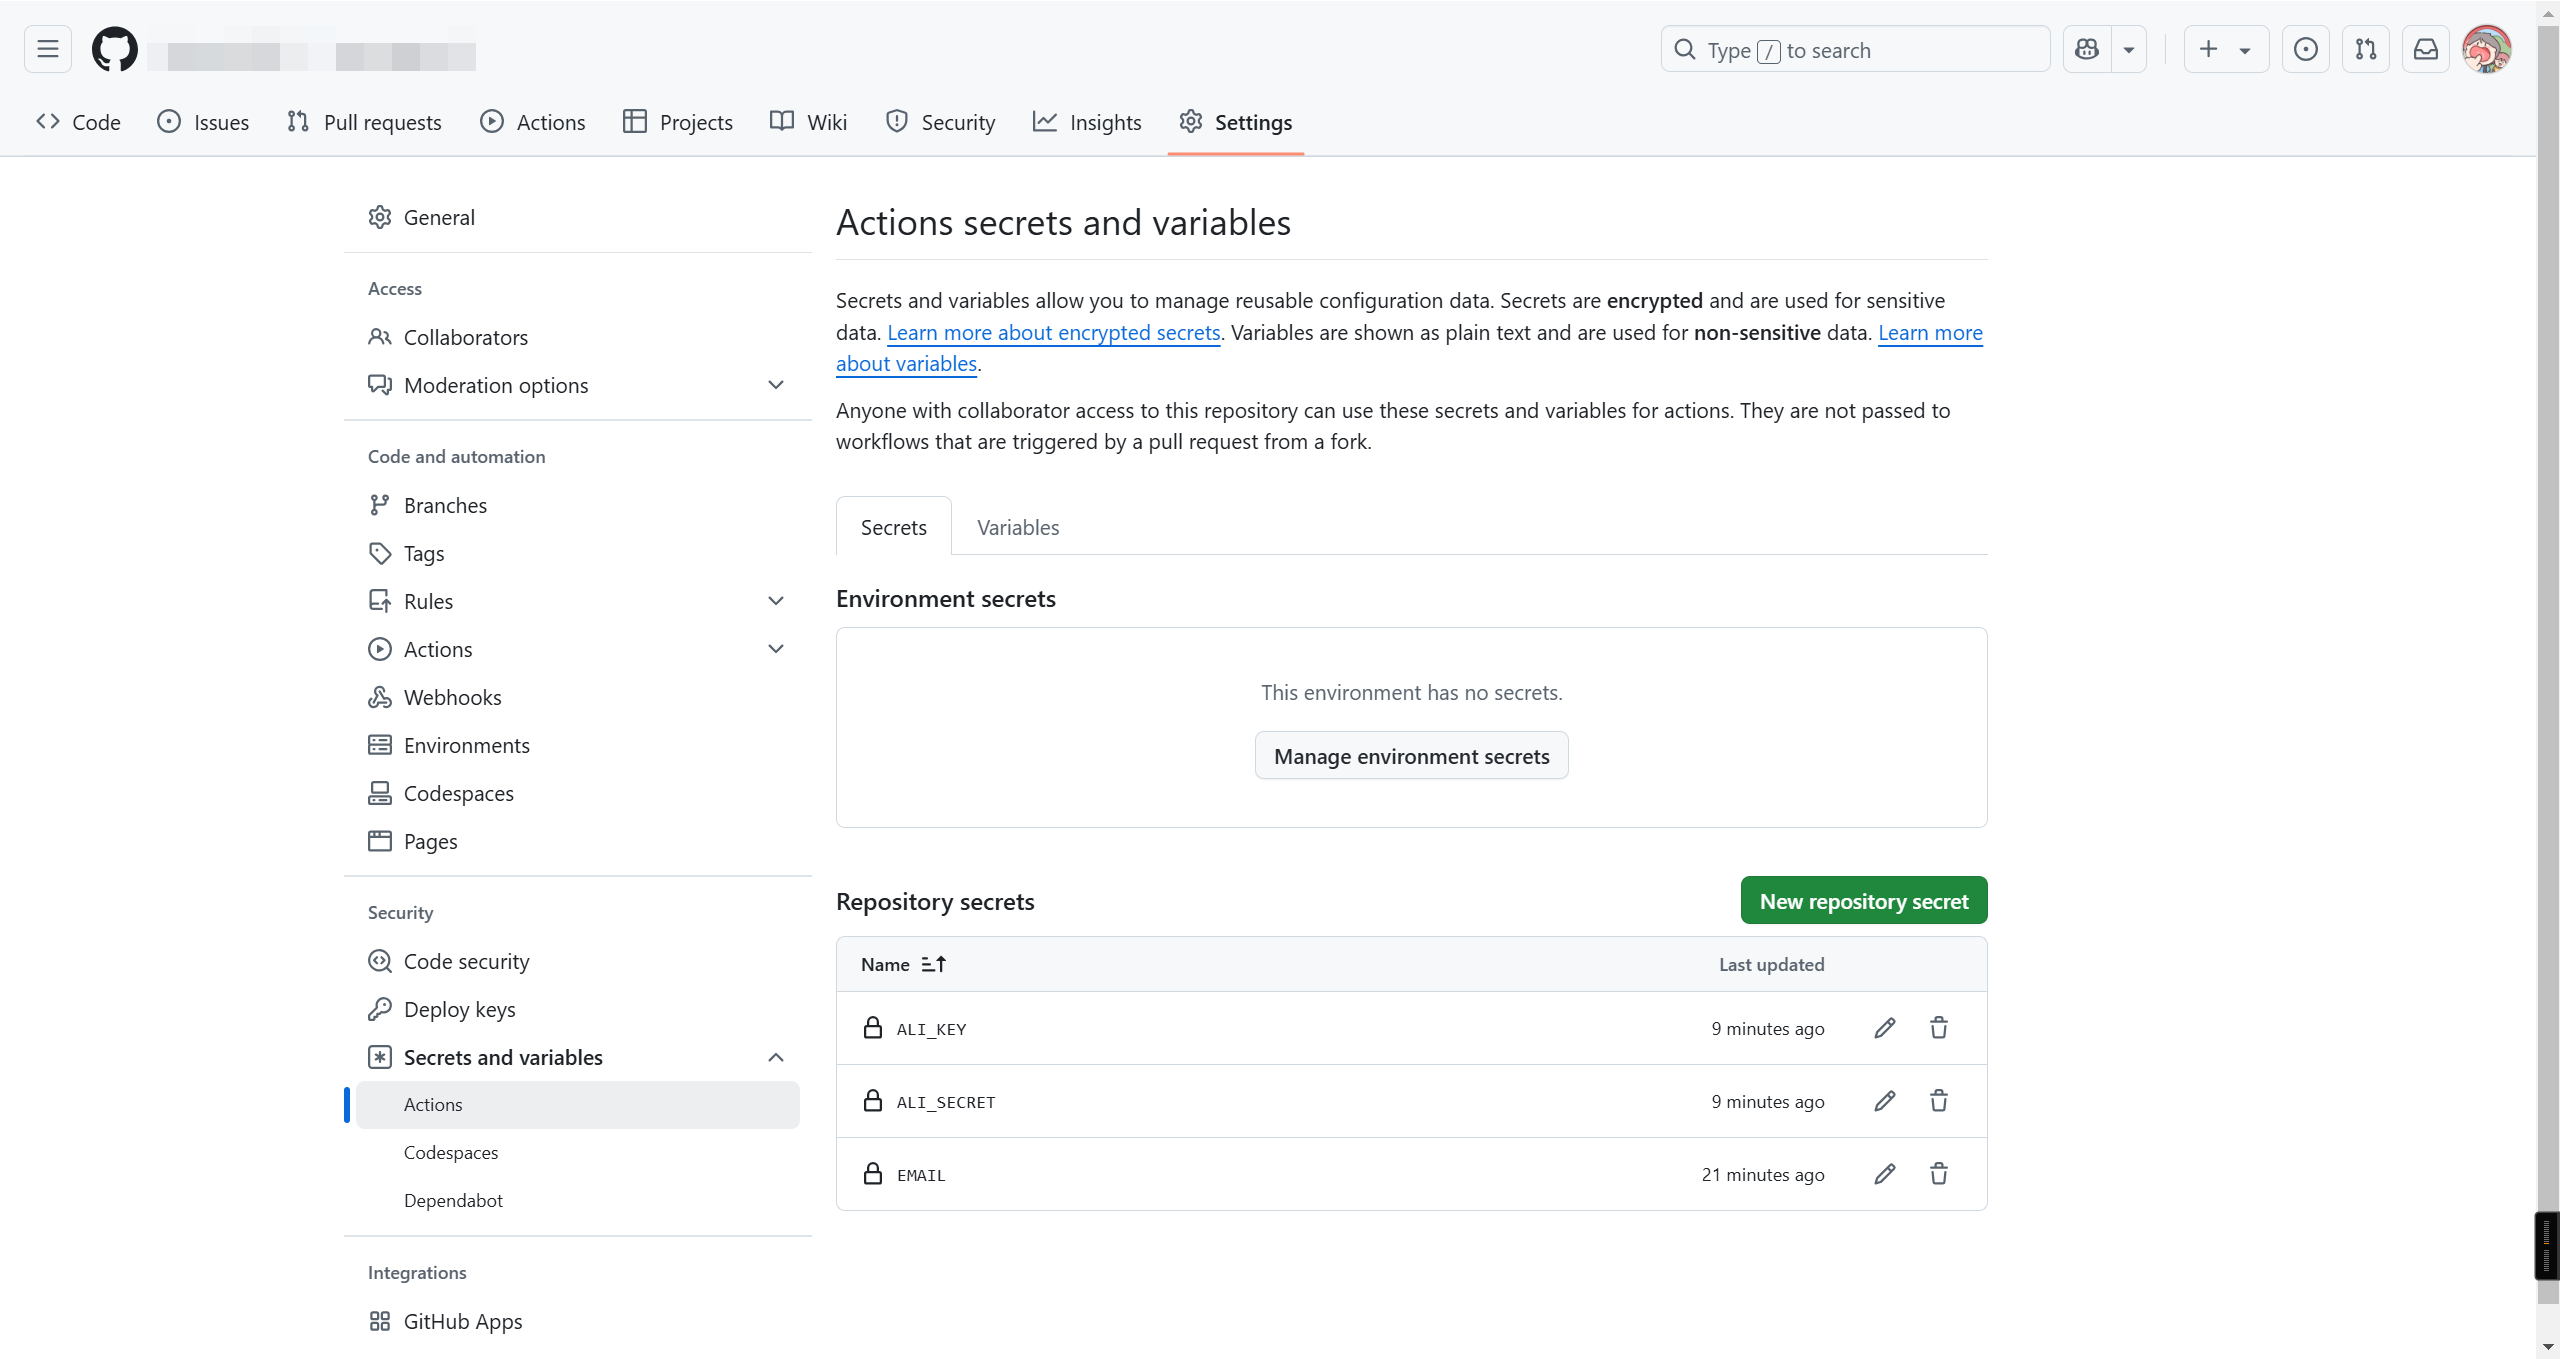
- 域名托管到阿里云:
- 访问 阿里云官网 并注册/登录账户。
- 在阿里云控制台中添加并管理您的域名。
- 申请阿里云的 AccessKey:
- 访问 阿里云 AccessKey 管理页面。
- 创建一个用户,不需要控制台访问。
- 为其添加
管理云DNS的权限。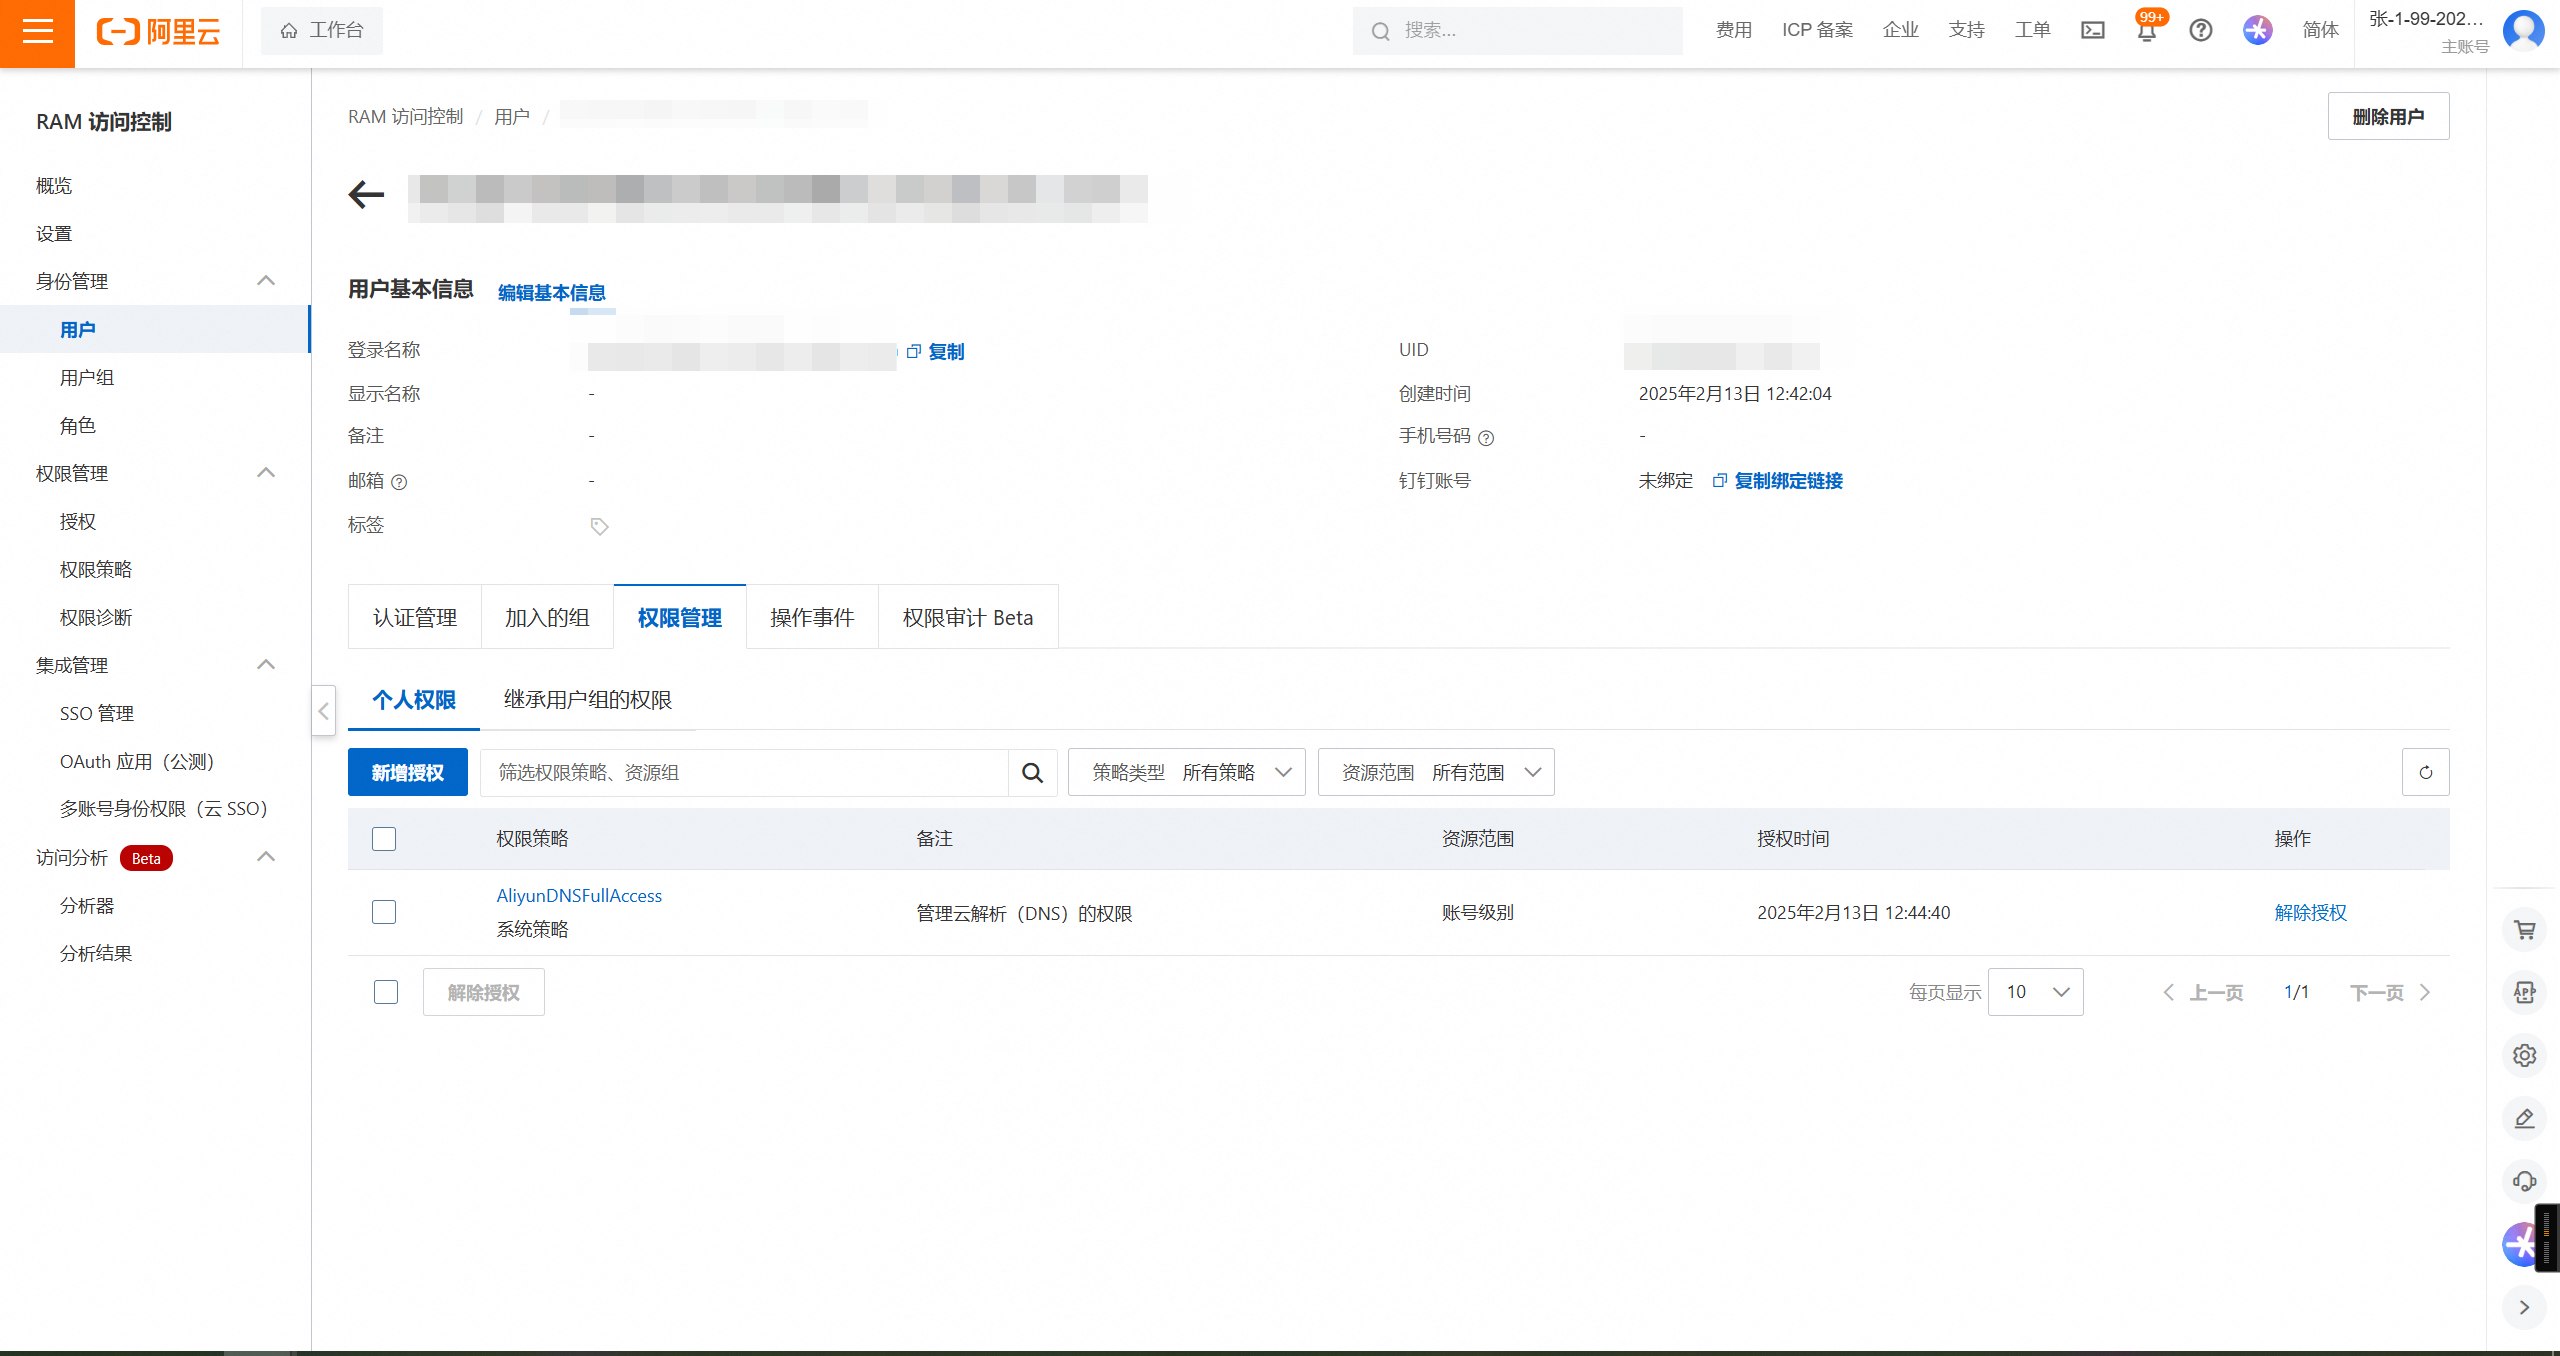
-
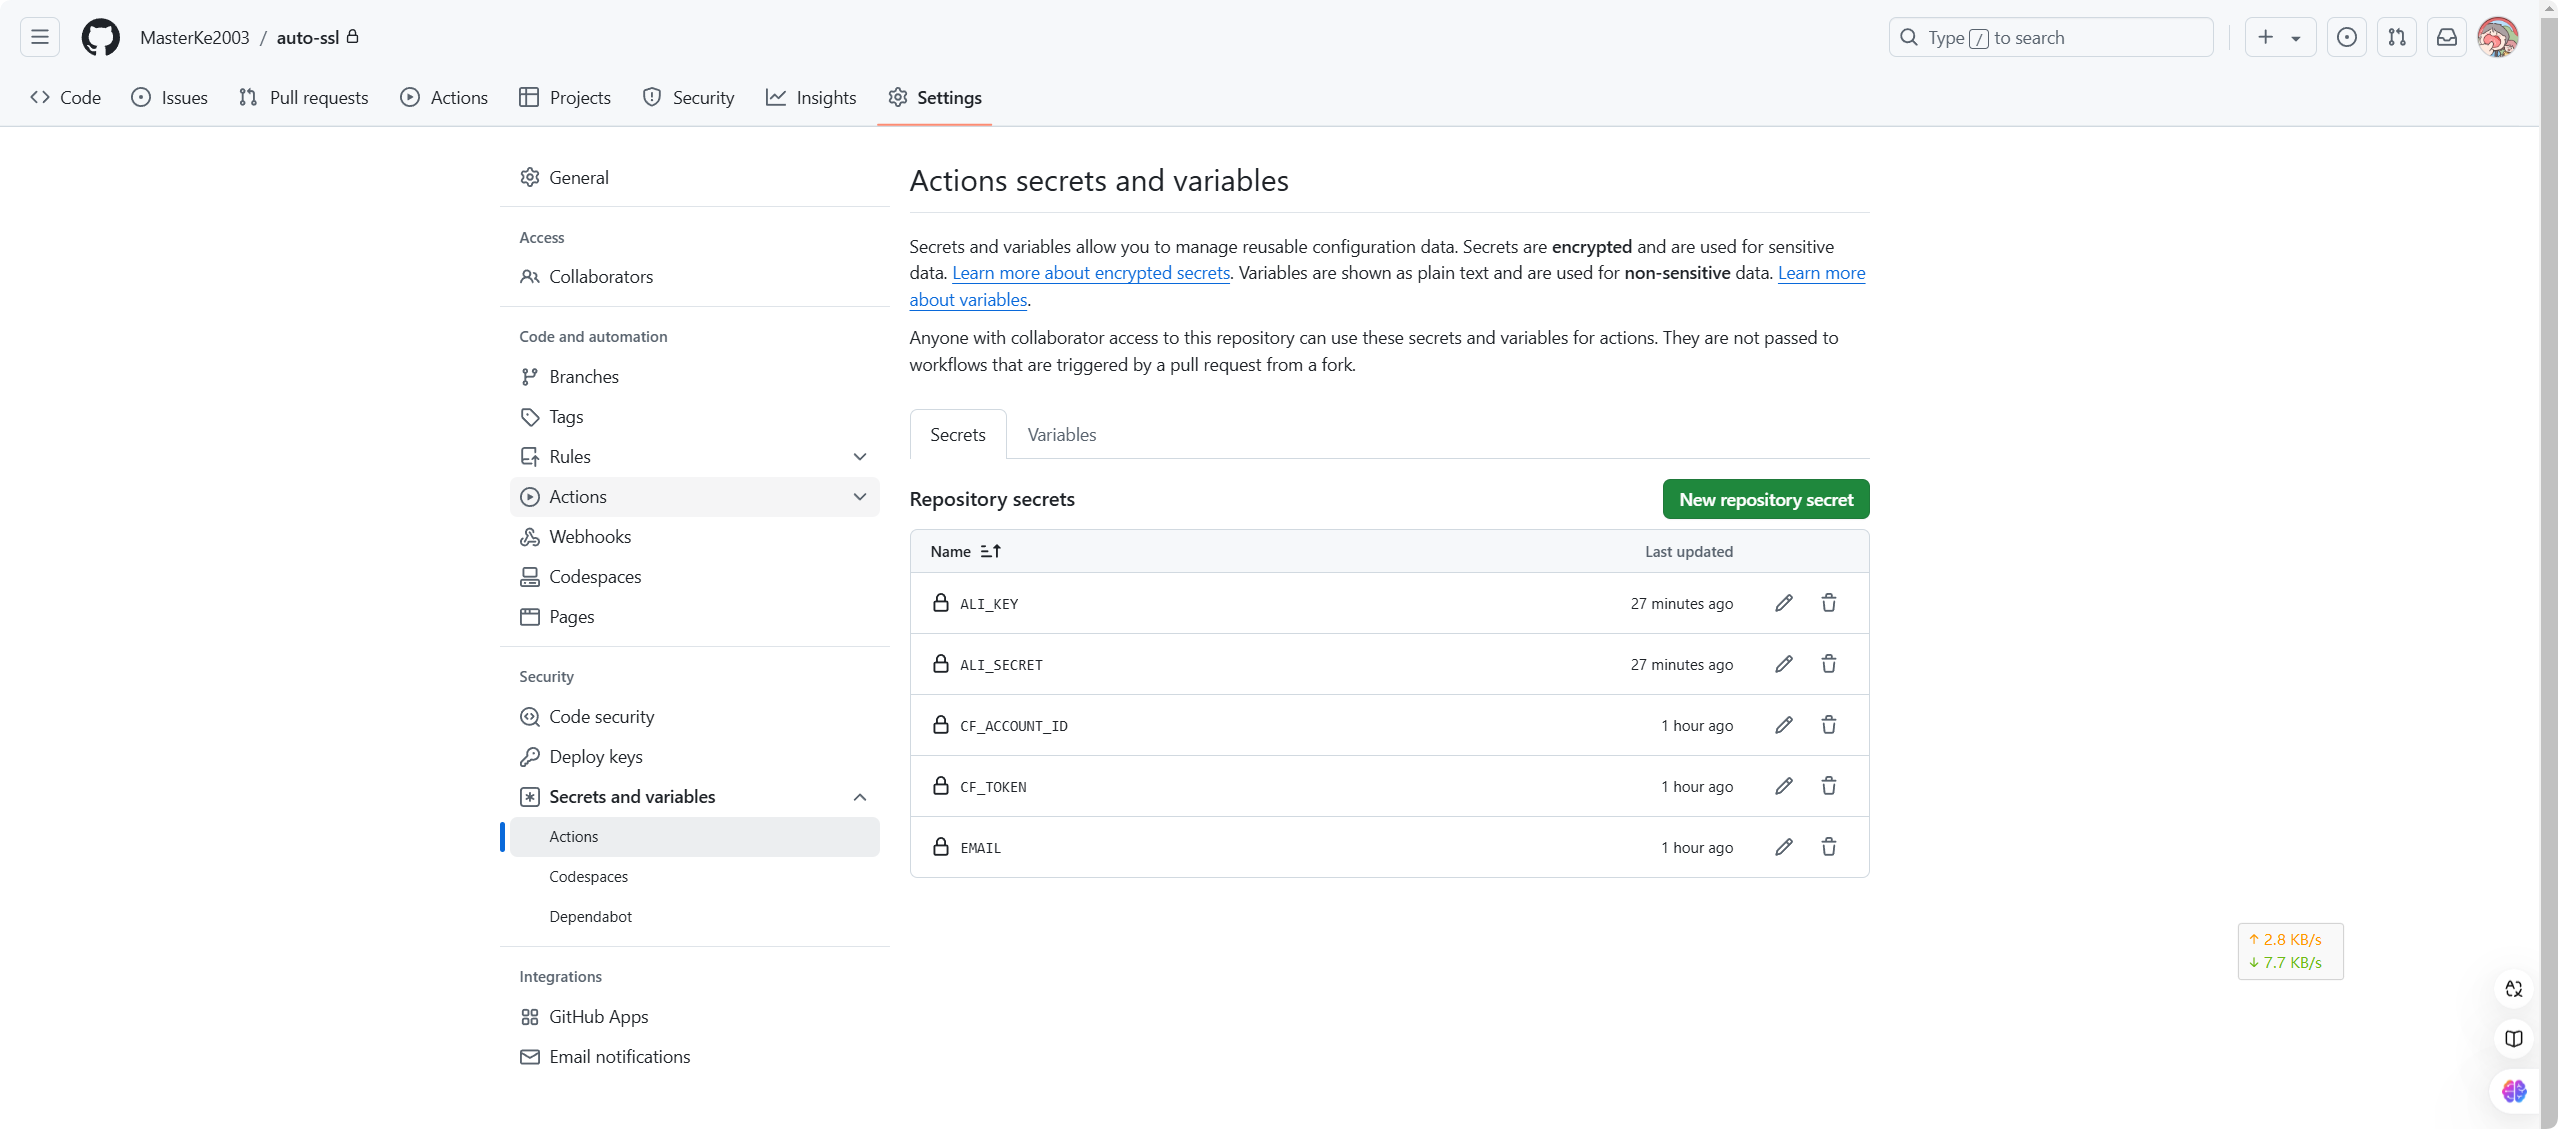
配置 GitHub 仓库的 Secrets:
- 修改
aliyun_domains_list.txt:- 在仓库中找到
aliyun_domains_list.txt文件。 - 将文件中的示例域名替换为您自己的域名,每行一个。
- 在仓库中找到
Cloudflare 配置
- 域名托管到 Cloudflare:
- 访问 Cloudflare 官网 并注册/登录账户。
- 添加您的域名,按照指引完成域名托管。
- 申请 Cloudflare 的 API Token:
- 访问 Cloudflare API Token 管理页面。
- 创建一个新的 API Token,确保赋予其 Edit zone DNS 权限。
- 获取 Cloudflare Account ID:
- 在 Cloudflare 首页,点击您托管的任意域名。
- 在右侧面板中找到并记录 Account ID。
- 配置 GitHub 仓库的 Secrets:
- 在您的 GitHub 仓库中,依次访问
Settings -> Security -> Secrets and variables -> Actions。 - 添加以下三个变量:
CF_TOKEN:上一步获取的 Cloudflare API Token。CF_ACCOUNT_ID:上一步获取的 Cloudflare Account ID。EMAIL:用于申请 SSL 的邮箱地址。
- 在您的 GitHub 仓库中,依次访问
- 修改
cloudflare_domains_list.txt:- 在仓库中找到
cloudflare_domains_list.txt文件。 - 将文件中的示例域名替换为您自己的域名,每行一个。
- 在仓库中找到
测试
手动触发 GitHub Actions
- 在仓库中找到 Actions 标签页。
- 手动触发配置好的 Workflow,观察执行结果,确保一切正常。
自动更新(2025.2.12更新)
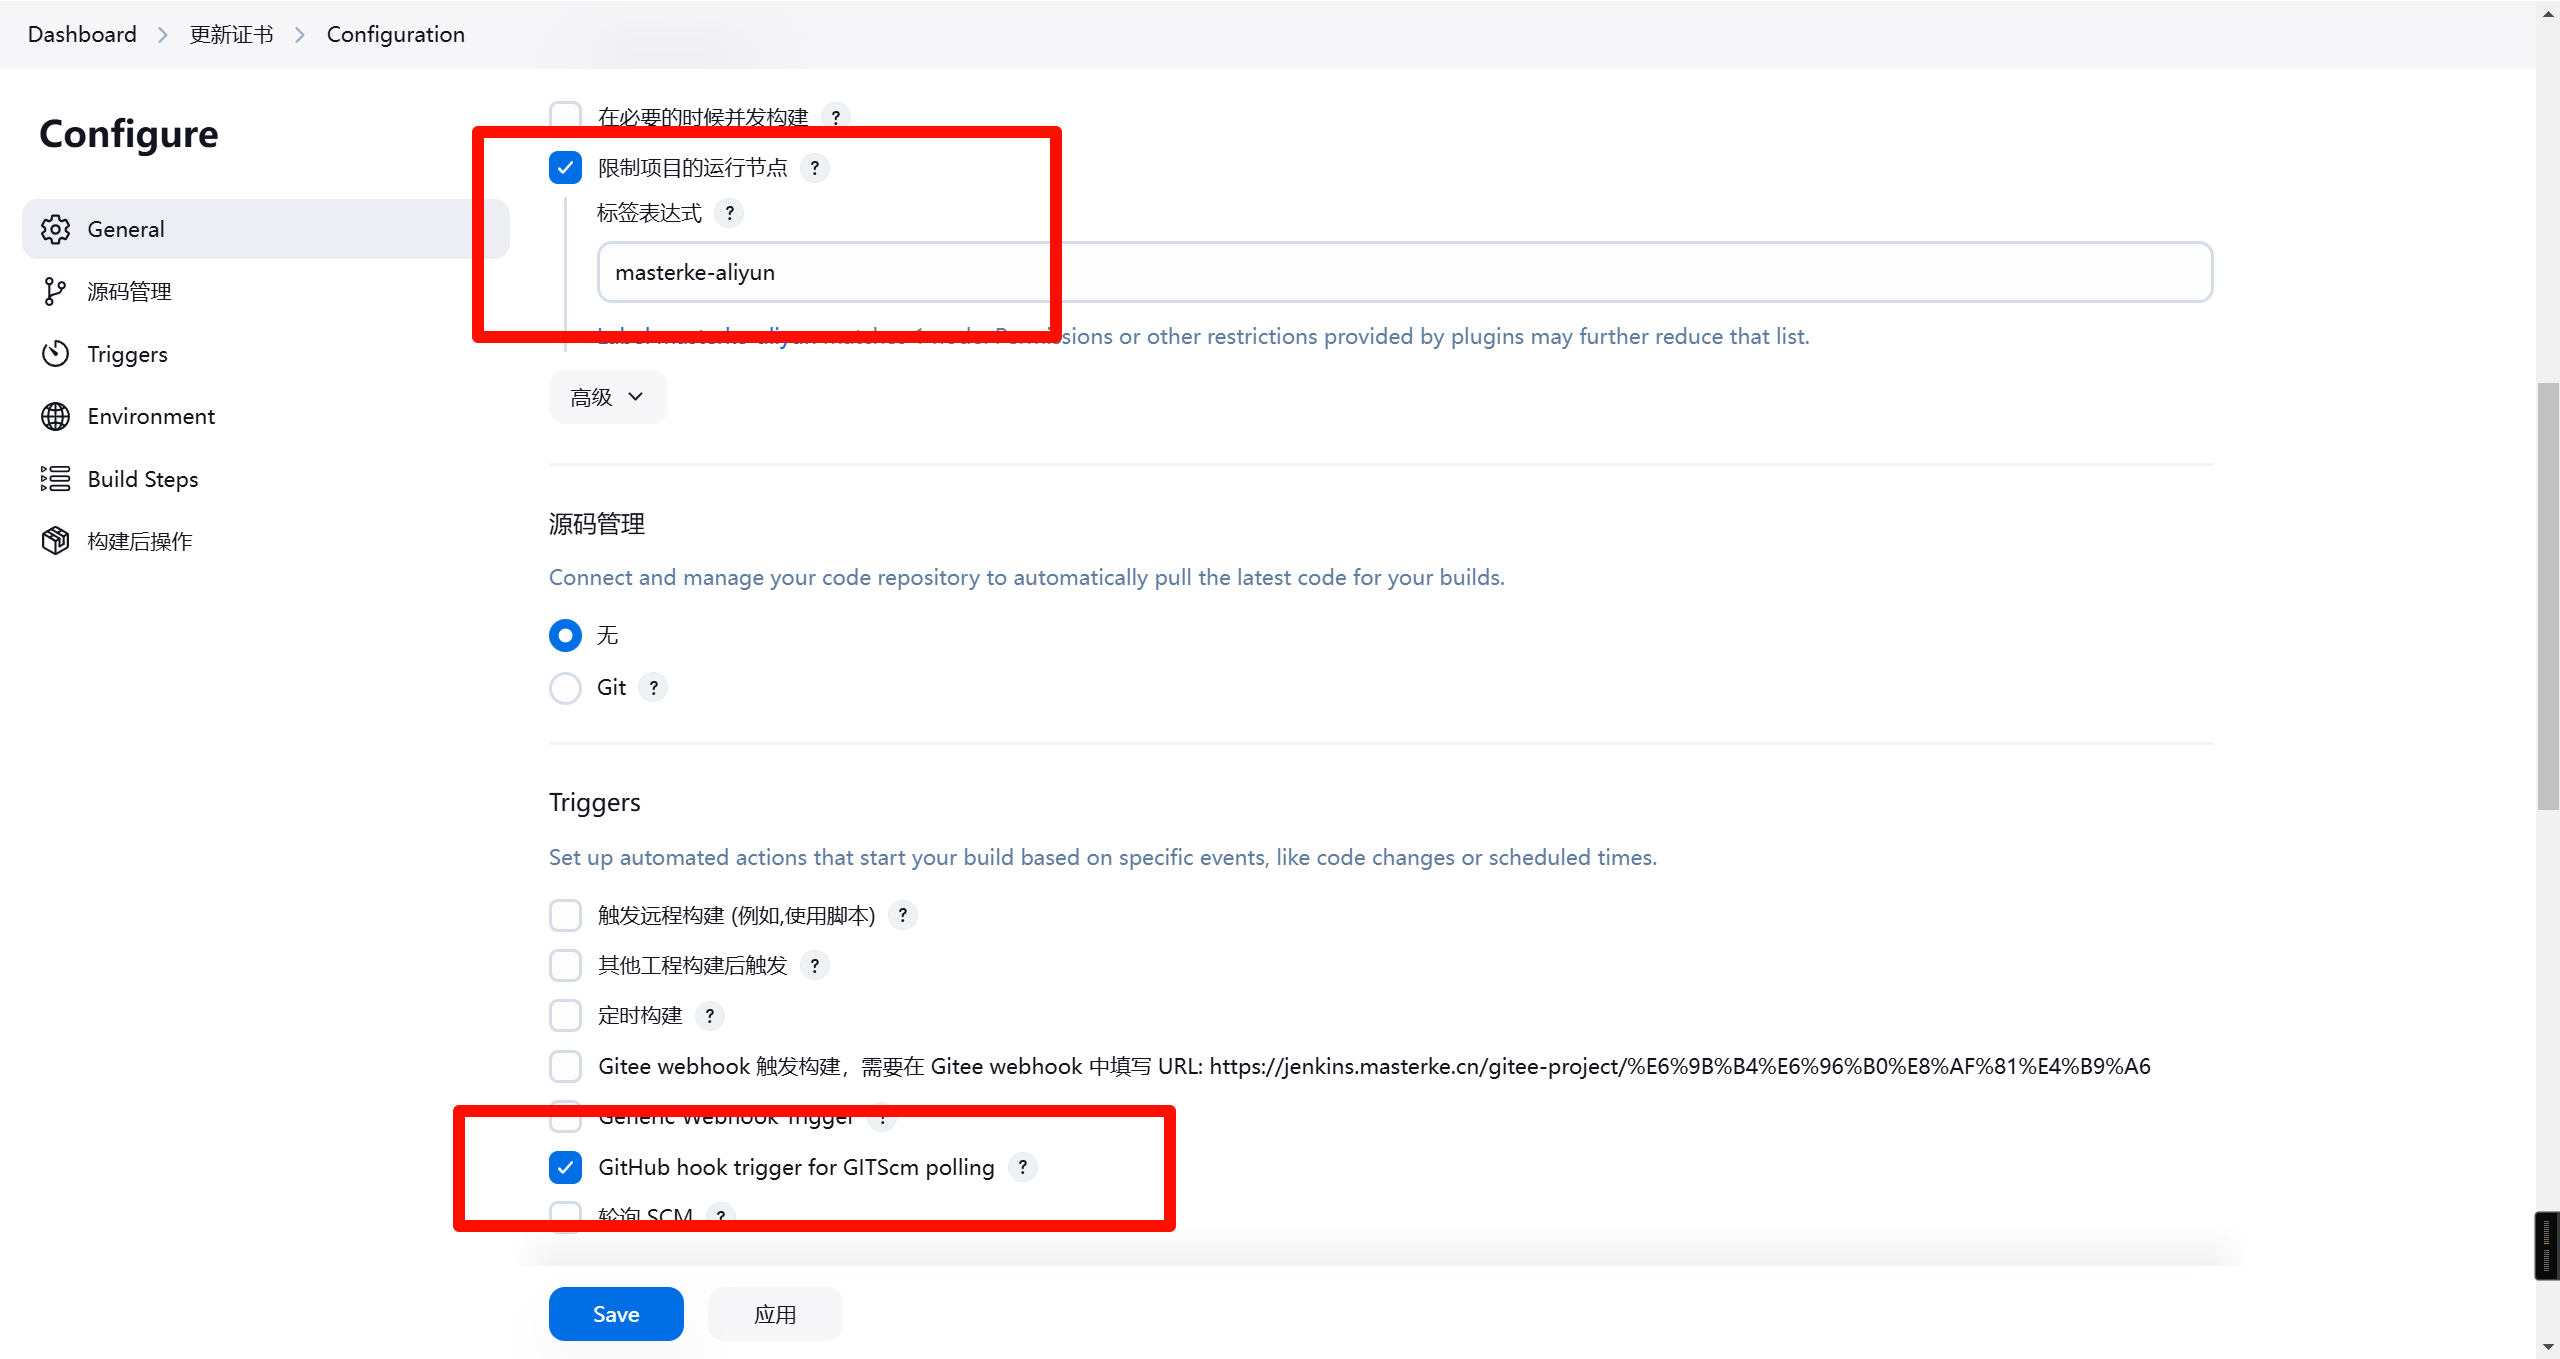
在Jenkins中添加一个任务,限制项目执行的节点为你的网页服务器:
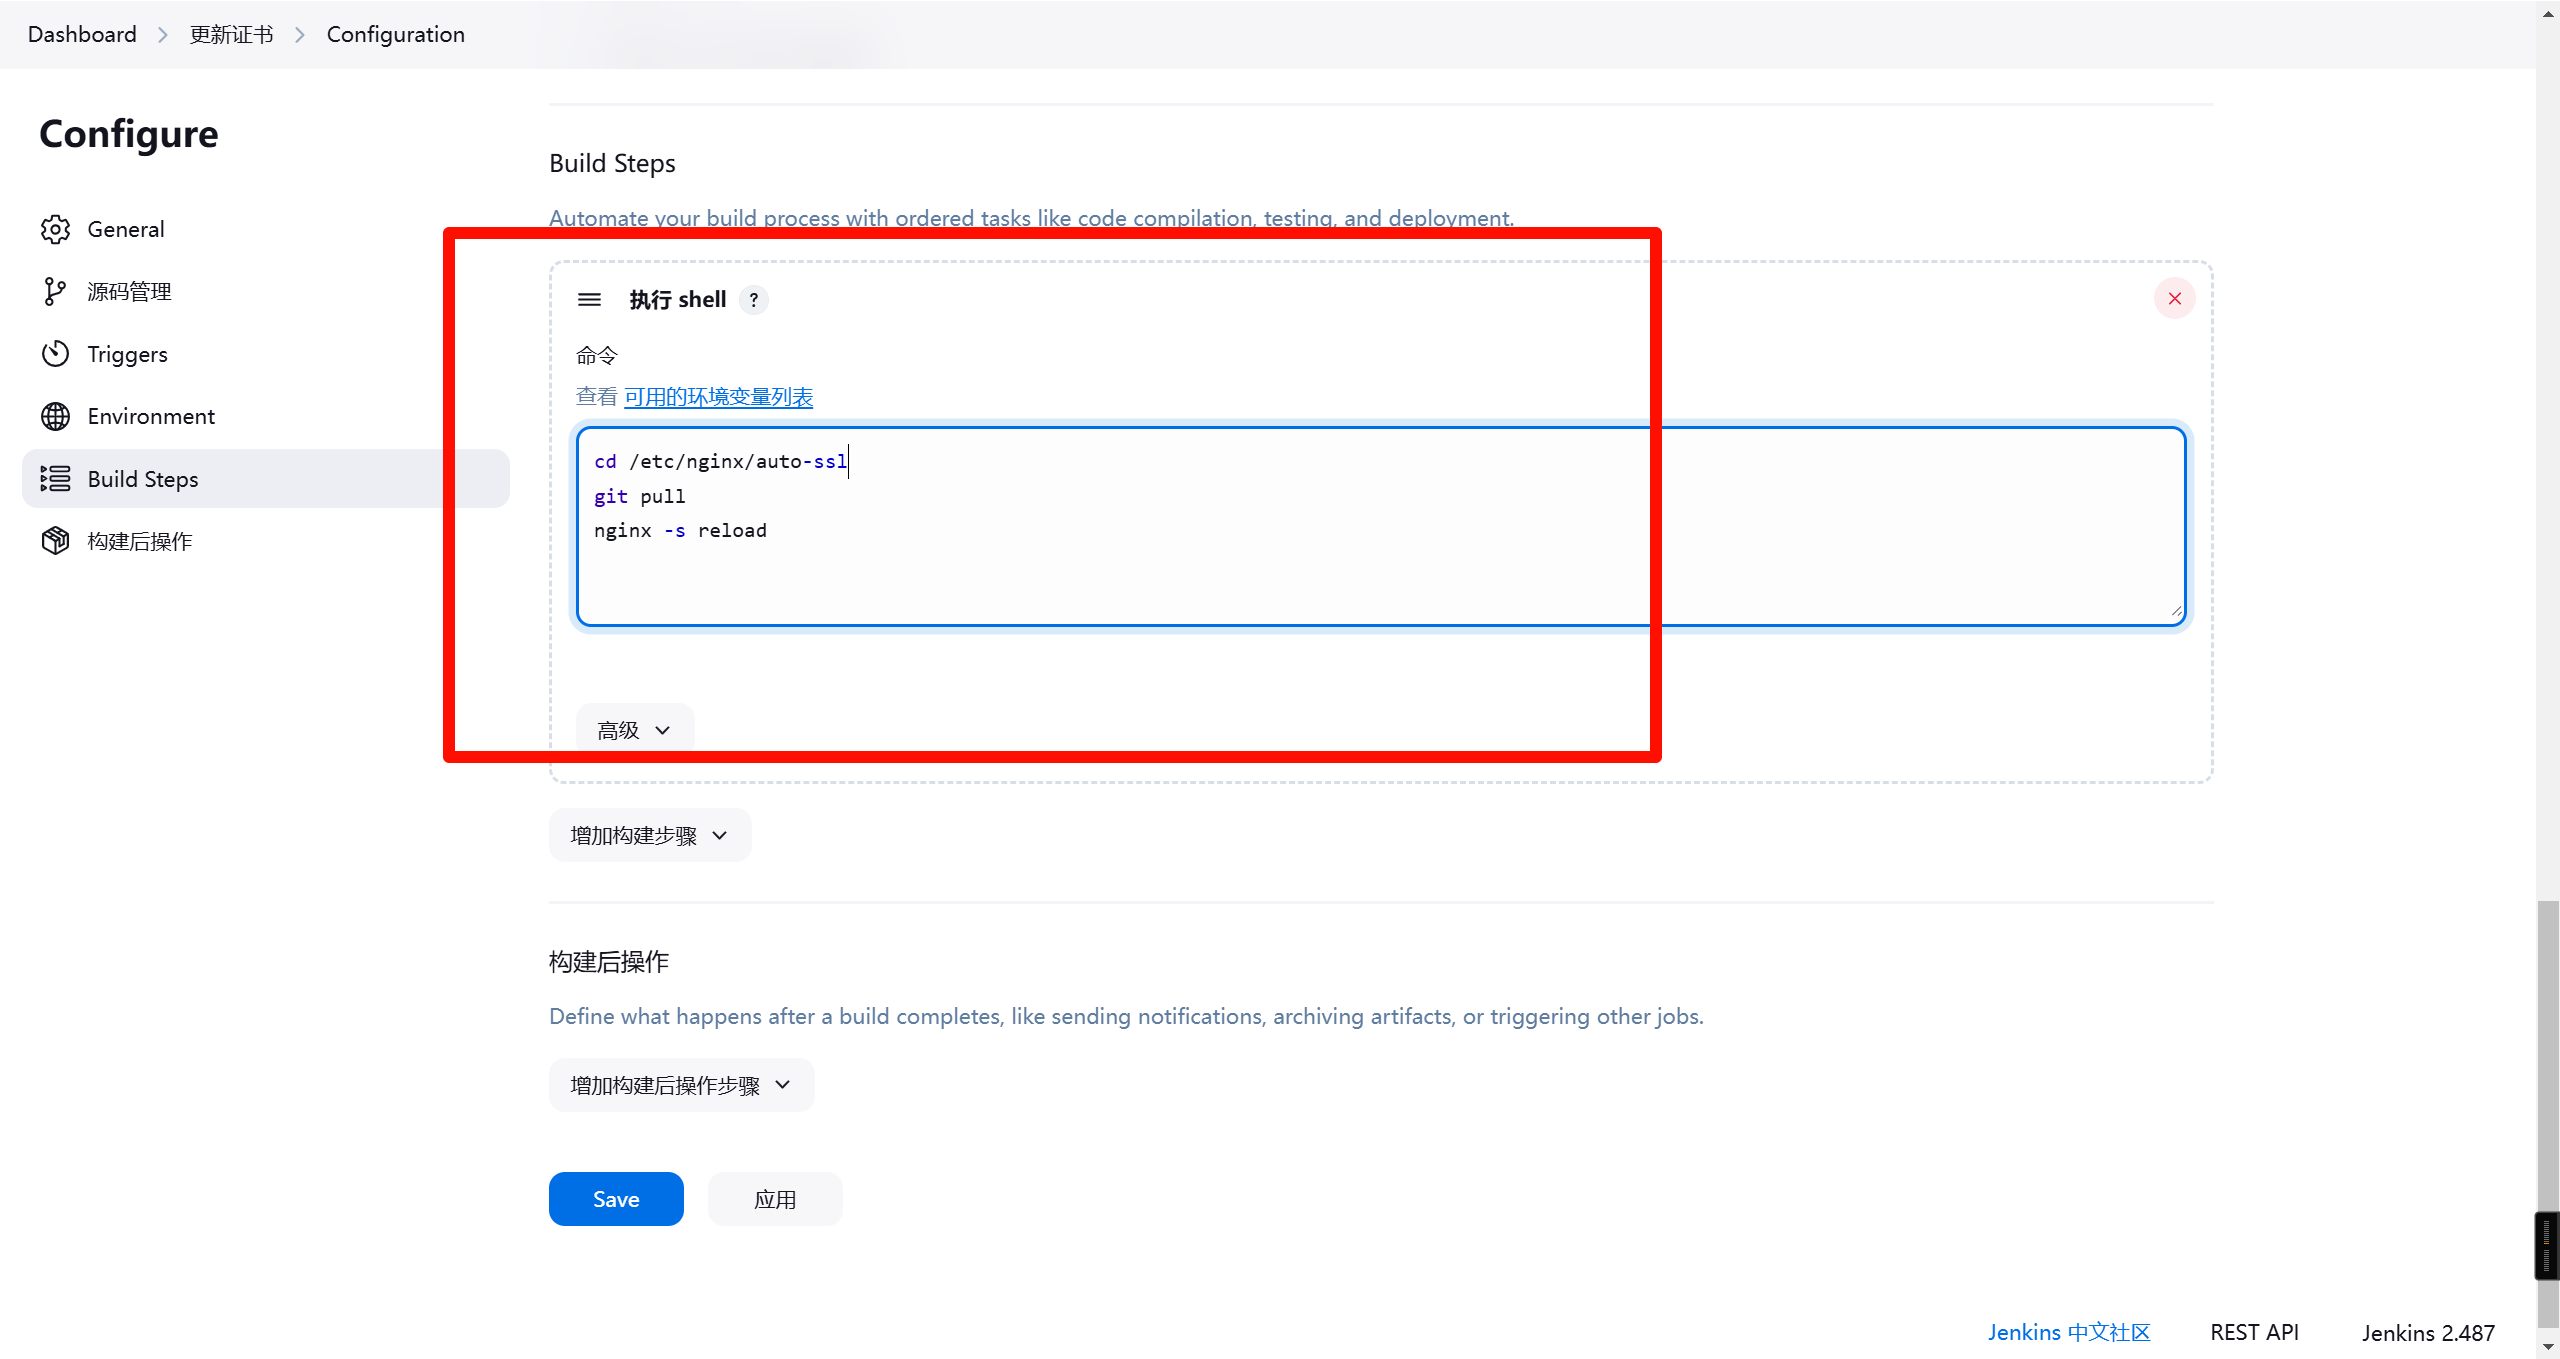
然后切换到auto-ssl项目下拉取最新代码,然后重载nginx即可:
1
2
3
cd /etc/nginx/auto-ssl
git pull
nginx -s reload
本文由作者按照
CC BY 4.0
进行授权

